iOS: Animate TableView Updates
Let’s be honest: tableView.reloadData is only there for two reasons:
- to load initial data
- to infuriate your internal perfectionist
Most data-driven apps use the server to fetch a new data and then display this data in the table view. When you reload the data, some of the items in your collection may not change, or the collection may only add/delete a few items without affecting all other items. Calling .reloadData() on the tableView will update the tableView instantly the scroll position will be ambiguous. Not the best user experience, right? In the most cases, you want smooth updates of appropriate sections and rows with a nice animation and without any flicks, jumps, or scrolls.
We will touch some advance and useful techniques, such as Protocol Conformance, Generics, Custom Subscripts (swift 4), Higher Order Functions, etc. Enjoy your reading!
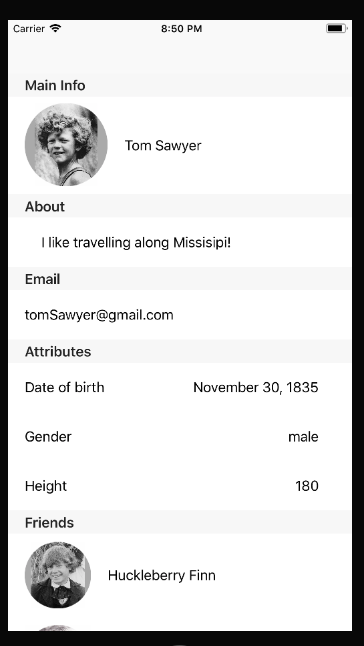
In one of my previous articles, I created an example app, that displays the sectioned data of different types.

The simplest way is adding a RefreshControl to this TableView, so we can reload it on pull-to-refresh. I will not cover this solution here. We are about to build the animated reloadable TableView, so let’s do something cool. How about using a real-time database, so all the changes will be pushed from the server right to the TableView?
You can download a starter project here.
Part 1: Basic preparation.
In this part, I will configure the project: update the ViewModel to work with new data, and set a delegate to notify the ViewController of any changes.
First, we need to update our ProfileViewModel. Currently, it doesn’t have any mechanism to neither reload the data nor to notify the ViewController.
In the ProfileViewModel class create a method loadData():
func loadData() {}
Now we need to move the view model parsing from init() to loadData():
func loadData() {
   guard let data = dataFromFile(“ServerData”), let profile = Profile(data: data) else {
      return
   }
   items.removeAll()   if let name = profile.fullName, let pictureUrl = profile.pictureUrl {
      let nameAndPictureItem = ProfileViewModelNamePictureItem(name: name, pictureUrl: pictureUrl)
      items.append(nameAndPictureItem)
   }   if let about = profile.about {
      let aboutItem = ProfileViewModelAboutItem(about: about)
      items.append(aboutItem)
   }   if let email = profile.email {
      let dobItem = ProfileViewModelEmailItem(email: email)
      items.append(dobItem)
   }   let attributes = profile.profileAttributes
   if !attributes.isEmpty {
      let attributesItem = ProfileViewModeAttributeItem(attributes: attributes)
      items.append(attributesItem)
   }   let friends = profile.friends
   if !profile.friends.isEmpty {
      let friendsItem = ProfileViewModeFriendsItem(friends: friends)
      items.append(friendsItem)
   }
}
Note: I added items.removeAll() at the beginning of the parsing method to make sure the data array is empty.
There are multiple ways to notify the ViewController that the new data has loaded. You can check this article to find out more. In this project, I will use a delegation:
protocol ProfileViewModelDelegate: class {
   func didFinishUpdates()
}
Create a delegate property in the ProfileViewModel class:
weak var delegate: ProfileViewModelDelegate?
And call the delegate method right after the data was parsed:
func loadData() {
   ...
   delegate?.didFinishUpdates()
}
The last step in this part will be using the delegate method from the ViewController. Inside the viewDidLoad assign the ProfileViewModelDelegateto self:
override func viewDidLoad() {
   super.viewDidLoad()
   viewModel.delegate = self
   ...
}
And add an extension that will conform to this protocol:
extension ViewController: ProfileViewModelDelegate {
   func didFinishUpdates() {

   }
}
Inside this method we need to reload the tableView and hide the refreshControl:
func didFinishUpdates() {
   tableView?.reloadData()
}
Finally, add the reloadData method in ViewController at the end of ViewDidLoad:
viewModel.loadData()
Part 2. Connect Firebase
As an example, we will use a a Firebase, that provides some real-time functionality. You can use any other socket-based framework, it you have a preference.
To configure the Firebase Database, visit the Firebase website, create an account if you don’t have one, and start a new project. Then follow the instruction and setup the project. We will only use the Firebase/Database, so you Podfile will only have one pod:
pod ‘Firebase/Database’
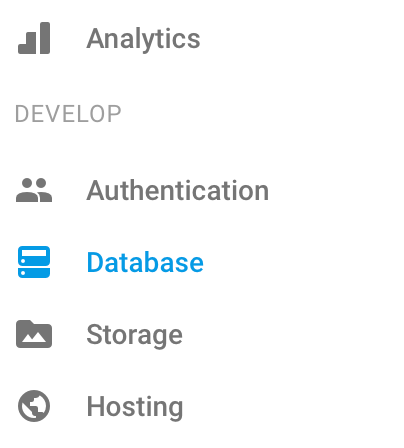
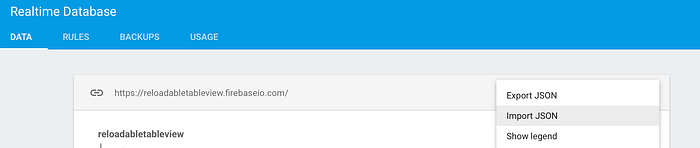
Go to the Firebase App Console, and select Database from the left menu:

Select ImportJSON to add the existing ServerData.json file from your xCode project folder:

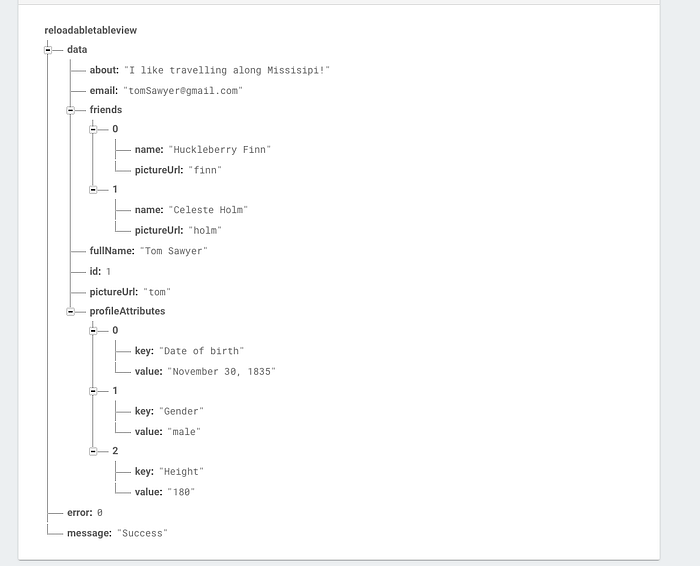
Once you import the file, you database will look like this:

The last step in configuring the Firebase will be changing its default Rules. Right now, only authorized users have an access to your database. We don’t need an authentication in this example, so your rules should allow the access for everyone:

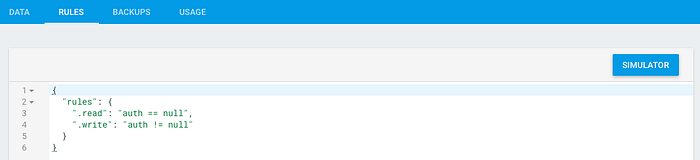
That’s all we need to use the real-time Database! Let’s try to load the data from to our app.
First, create the new file that will be our Network Manager:
class NetworkManager {
   static let shared = NetworkManager()
   private init() { }   func loadData(onSuccess:  @escaping (Profile) -> Void) {
      ref.observe(DataEventType.value, with: { (snapshot) in
         let profileDict = snapshot.value as? [String : AnyObject]
         if let profile = Profile(data: profileDict) {
            onSuccess(profile)
         }
      })
   }
}
Note, this method is parsing the JSON right to the Profile model, so you can remove dataFromFile() method from Profile Model.For the simplicity, we don’t have an Error handler. If the Firebase returns an error, we will pretend we don’t see it.
We also need to change the Profile initializer, because now we use [String: AnyObject] instead of Data:
init?(data: [String: AnyObject]?) {
   guard let data = data, let body = data[“data”] as? [String: Any] else {
      return nil
   }   self.fullName = body[“fullName”] as? String
   self.pictureUrl = body[“pictureUrl”] as? String
   self.about = body[“about”] as? String
   self.email = body[“email”] as? String

   if let friends = body[“friends”] as? [[String: Any]] {
      self.friends = friends.map { Friend(json: $0) }
   }   if let profileAttributes = body[“profileAttributes”] as? [[String: Any]] {
      self.profileAttributes = profileAttributes.map { Attribute(json: $0) }
   }
}
Next, we will refactor our code in ProfileViewModel.
Create a method parseData and move all the code from loadData:
private func parseData(profile: Profile) {
   items.removeAll()
   if let name = profile.fullName, let pictureUrl = profile.pictureUrl {
      let nameAndPictureItem = ProfileViewModelNamePictureItem(name: name, pictureUrl: pictureUrl)
      items.append(nameAndPictureItem)
   }   ... // items parsing code   delegate?.didFinishUpdates()
}
Note: we no longer need to call dataFromFile(), because we already parsed the JSON to Model in out Network Manager
Next, update the loadData method:
func loadData() {
   NetworkManager.shared.loadData { [weak self] profile in
      self?.setData(profile: profile)
   }
}
Run the project, and you will see the initial data loaded to the tableView.Modify the data on Firebase Database. For example, remove the array of attributes. You will see the update immediately, but the attributes will just disappear, and the all the sections below will instantly move. This is because we use ReloadData to refresh the tableView.

Now it’s time to drive the tableView updates smooth and independent for each section and row.
Part 3. Data Source Updates
If we want to update the tableView sections independently, we need to know, what is changed after the update. In other words, we need to find the difference between the existing Data Source and the new one.
This is a classic computer science problem, called The Longest Common Subsequence Problem. Implementing the algorithm in Swift will require a long time, deep computer science knowledge and a huge effort overall. In our project, this problem becomes even more complicated, because we are using a nested data structure (each data item can have multiple children).
The question is, do we really need to find a write a diff utility for this project?
There are a few unique features in our data structure that we can benefit from:
- The section items order is always the same because we create a data array manually each time we receive a new data. The cell items inside the section are also sorted.
- We can only have one section item if each type of the data array. In other words, each section item in the data array is unique. However, the cell items currently don’t have any unique identifier.
- We have a limited number of section items
So, what do we need to know about each item in two data arrays?
First is the unique key. It will determine if we need to delete, insert or update the item. For example, if the old data doesn’t have a Friends section, and the new one does have it, we simply need to insert this new section. Similarly, if the old data has Email section, be the new data doesn’t have it, we have to remove this section. If both old and new data has the items of the same type, we need to compare them to find actual changes.
Second is the value itself. We will use the item values to compare them and see if there are any difference between them.
The third one is the current item index. If we need to delete, remove, or update the item, we have to know its position in the data array.
So, we need to hold 3 variables for each section: unique key, value, and index.
Create a DiffCalculator.swift file.
struct ReloadableSection: Equatable {
   var key: String
   var value: ?
   var index: Int   static func ==(lhs: ReloadableSection, rhs: ReloadableSection) -> Bool {
      return lhs.key == rhs.key && lhs.value == rhs.value
   }
}
- key is a unique identifier for the items. Only one item in the data array can have this key.
- value is the cell items, that is another array. We will add a data type below.
- index is the current position of this item in the data array.
The ReloadableSection conforms to the Equatable, so we can compare different sections to each other.
Let’s create another data type for the cell items. We will have to find the difference between the cells as well, so it should have have the same structure, as we discussed for the section (key, value, and index):
struct ReloadableCell: Equatable {
   var key: String
   var value: ?
   var index: Int   static func ==(lhs: ReloadableCell, rhs: ReloadableCell) -> Bool {
      return lhs.key == rhs.key && lhs.value == rhs.value
   }
}
The ReloadableCell should conform to the Equatable protocol, because we will have to compare different objects of this type.
Instead of using the specific data type for value, let’s make this structure generic. This will allow us to use different types of cells without modifying the algorithm:
struct ReloadableCell<N: Equatable>: Equatable {
   var key: String
   var value: N
   var index: Int
   ...
}
Note, that the value <N> should be Equatable (so we can compare the values).
Finally, set the data type for value variable inside the ReloadableSection to the array of ReloadableCells. Because the ReloadableCell is generic, the ReloadableSection will become generic:
struct ReloadableSection<N: Equatable> {
   var key: String
   var value: [ReloadableCell<N>]
   var index: Int
   ...
}
Now we have a clear structure for the Sections and Cells, that we can use for our algorithm to find the changes.
Let’s create a structure that will hold the sections and the cells changes. Both can only have three types of updates: insertion, deletion, and update:
class SectionChanges {
   var insertsInts = [Int]()
   var deletesInts = [Int]()
   var updates = CellChanges()
}class CellChanges{
   var inserts = [IndexPath]()
   var deletes = [IndexPath]()
   var reloads = [IndexPath]()
}
Note, the CellChanges have the changes as arrays on IndexPath. This will be convenient, because the TableView use this type for all cell updates.
SectionChanges have the changes as an array of integers. The TableView use IndexSet for section insertions and deletions, so we will add a few computed properties:
class SectionChanges: Equatable {
   ...
   var inserts: IndexSet {
      return IndexSet(insertsInts)
   }   var deletes: IndexSet {
      return IndexSet(deletesInts)
   }
}
Now we are ready to calculate the difference for the two given arrays of ReloadableSection. We will create a class DiffCalculator with a static method calculate:
class DiffCalculator {
   static func calculate<N>(oldSectionItems: [ReloadableSection<N>], newSectionItems: [ReloadableSection<N>]) -> SectionChanges {   }
}
The return type is the SectionChanges, so we initialize the empty object of this type and return it.
static func calculate<N>(oldSectionItems: [ReloadableSection<N>], newSectionItems: [ReloadableSection<N>]) -> SectionChanges {
   let sectionChanges = SectionChanges()
   ...
   return sectionChanges
}
First, we have to find all the data keys, that we have in both old and new data. To do that, we create a combined array of oldSectionItems and newSectionItems, extract the keys from this array, and remove the duplicates from the keys array:
static func calculate<N>(oldSectionItems: [ReloadableSection<N>], newSectionItems: [ReloadableSection<N>]) -> SectionChanges {
      ...
      let uniqueSectionKeys = (oldSectionItems + newSectionItems)
         .map { $0.key }
         .filterDuplicates()
}
You need to add the RemoveDuplicate array extension method:
extension Array where Element: Hashable {/// Remove duplicates from the array, preserving the items order
   func filterDuplicates() -> Array<Element> {
      var set = Set<Element>()
      var filteredArray = Array<Element>()
      for item in self {
         if set.insert(item).inserted {
            filteredArray.append(item)
         }
      }
      return filteredArray
   }
}
Initialize the empty object of type CellChanges, so we can store any updates for the section cell in it:
static func calculate<N>(oldSectionItems:[ReloadableSection<N>], newSectionItems:[ReloadableSection<N>]) -> SectionChanges {
   ...
   let cellChanges = CellChanges()
}
Having the array of all the unique keys in both old and new ReloadableSection items, we need to find out, what items were changed, deleted, and removed. So, we loop through the items of the uniqueSectionKeys array:
static func calculate<N>(oldSectionItems: [ReloadableSection<N>], newSectionItems: [ReloadableSection<N>]) -> SectionChanges {
   ...
   for sectionKey in uniqueSectionKeys {   }
}
For each sectionKey we have to find the item in old and new section items. Currently, the array of ReloadableSection does not have a way to find a specific item for a given key. How can we this add this functionality? Let’s wrap it on another data structure, so we can have a few custom subscripts:
struct ReloadableSectionData<N: Equatable>: Equatable {
   var items = [ReloadableSection<N>]()subscript(key: String) -> ReloadableSection<N>? {
      get {
         return items.filter { $0.key == key }.first
      }
   }subscript(index: Int) -> ReloadableSection<N>? {
      get {
         return items.filter { $0.index == index }.first
      }
   }
}
Using subscripts, we can have an easy access to the elements in the array of ReloadableSection for both key and index. Note, that this subscript returns an optional value. This means, if the array of items does not have the item with the provided key or index, it will return nil.Because we use a generic data in the struct, the struct itself we also become generic.
Using the subscript, we find the items for the sectionKey:
static func calculate<N>(oldSectionItems:[ReloadableSection<N>], newSectionItems:[ReloadableSection<N>]) -> SectionChanges {
   ...
   for sectionKey in uniqueSectionKeys {
      let oldSectionItem = ReloadableSectionData(items: oldSectionItems)[sectionKey]
      let newSectionItem = ReloadableSectionData(item: newSectionItems)[sectionKey]
   }
}
Note, that both oldSectionItem and newSectionItem are optionals. If the item is nil, it means, the array of ReloadableSection doesn’t have any items with the provided key. So we have to consider three cases:
- both old and new items exist -> the item with this key was updated
- old item exists, but the new items is nil -> item with this key was deleted
- new item exists, but the old item is nil -> item with this key was added
Case 1. Both new and old data has the item with the requested key.
for sectionKey in uniqueSectionKeys {
   ...
   if let oldSectionItem = oldSectionItem, let newSectionItem = newSectionItem {}
In this case, we need to check, if the items are different. This is where we use the Equatable protocol conformance. If the old item and the new items are not the same, we need to go inside the section and find the difference between the cells:
for sectionKey in uniqueSectionKeys {
   ...
   if let oldSectionItem = oldSectionItem, let newSectionItem = newSectionItem {
      if oldSectionItem != newSectionItem {      }
   }
}
We check for the updates in cells the same way we did it for the sections: find all the cellKeys in the array of cells:
if oldSectionItem != newSectionItem {
   let oldCellIData = oldSectionItem.value
   let newCellData = newSectionItem.value
   let uniqueCellKeys = (oldCellIData + newCellData)
      .map { $0.key }
      .filterDuplicates()
}
We have loop through the keys in the uniqueCellKeys and find the associated cells. First, add a ReloadableCellData structure that is similar to the ReloadableSectionData, so you can access the elements in the array using a subscript:
struct ReloadableCellData<N: Equatable>: Equatable {
   var items = [ReloadableCell<N>]()subscript(key: String) -> ReloadableCell<N>? {
      get {
         return items.filter { $0.key == key }.first
      }
   }subscript(index: Int) -> ReloadableCell<N>? {
      get {
         return items.filter { $0.index == index }.first
      }
   }
}
loop through the uniqueCellKeys and find the cell under each key:
if oldSectionItem != newSectionItem {
   ...
   for cellKey in uniqueCellKeys {
      let oldCellItem = ReloadableCellData(items: oldCellIData)[cellKey]
      let newCellItem = ReloadableCellData(items: newCellData)[cellKey]
   }
}
Again, we check if both newCellItem and oldCellItem exist:
for cellKey in uniqueCellKeys {
   ...
   if let oldCellItem = oldCellItem, let newCelItem = newCellItem {
      if oldCellItem != newCelItem {
          // cell reload
      }
    } else if let oldItem = oldItem {
      // cell delete
    } else if let newItem = newItem {
      // cell insert
    }
}
If oldCellItem is equal to the newCellItem, we have to reload the cell. So we find the IndexPath for this cell and append to the reloads array of the cellChanges:
if oldCellItem != newCelItem {
   // cell reload
   cellChanges.reloads.append(IndexPath(row: oldCellItem.index, section: oldSectionItem.index))
}
Note, that we use the index of oldCellItem and oldSectionItems, because we want to update the existing IndexPath.
If the cell was removed, append its IndexPath to the deletes array on the cellChanges:
} else if let oldItem = oldItem {
   // cell delete
   cellChanges.deletes.append(IndexPath(row: oldCellItem.index, section: oldSectionItem.index))
}
Again, we use the index of oldCellItem and oldSectionItems, because we want to remove the item under the existing IndexPath.
If the cell was inserted, append its IndexPath to the inserts array on the CellChanges:
} else if let newCellItem = newCellItem {
   // cell insert
   cellChanges.inserts.append(IndexPath(row: newCellItem.index, section: newSectionItem.index))
}
This time, we use the index of newCellItem and newSectionItems, because we want to insert the new item, so it has the new IndexPath.
This completes the Section Update case. lets move on to the section insertion and section deletion.
Case 2. The section was removed from the data.
We delete the section from the data by appending its index to the SectionChanges.deletes:
if let oldSectionItem = oldSectionItem, let newSectionItem = newSectionItem {
   // section update
   ...
} else if let oldItem = oldItem {
   // section delete
   sectionChanges.deletes.append(oldItem.index)
} else if let newItem = newItem {
   // section insert

}
Case 3. The new section was added to the data.
We add the section to the data array by appending its index to the SectionChanges.inserts:
if let oldSectionItem = oldSectionItem, let newSectionItem = newSectionItem {
   // section update
   ...
} else if let oldItem = oldItem {
   // section delete
   ...
} else if let newItem = newItem {
   // section insert
   sectionChanges.inserts.append(newItem.index)
}
Finally, we assign the cellChanges to the sectionChanges.updates and return the SectionChanges:
static func calculate<N>(oldSectionItems: [ReloadableSection<N>], newSectionItems: [ReloadableSection<N>]) -> SectionChanges {
   ...
   let sectionChanges = SectionChanges()
   ...
   let cellChanges = CellChanges()
   ...
   for sectionKey in uniqueSectionKeys {
      ...
   }   sectionChanges.updates = cellChanges
   return sectionChanges
}
Part 4. Setup the ViewModel
We already have an enum of all possible Profile model item types (simply saying — all possible section types).
enum ProfileViewModelItemType {
   case nameAndPicture
   case about
   case email
   case friend
   case attribute
}
This types will be the unique SectionData.key, that we declared in the previous part. As you remember, this key has to be a String. We can update the protocol protocol using String type:
enum ProfileViewModelItemType: String {
   case nameAndPicture = "nameAndPicture"
   case about = "about"
   case email = "email"
   case friend = "friend"
   case attribute = "attribute"
}
Next, we will modify the ProfileViewModelItem. Remove the RowCountproperty. Each section item will now hold the array of cells:
protocol ProfileViewModelItem {
   var type: ProfileViewModelItemType { get }
   var sectionTitle: String { get }
   var cellItems: [CellItem] { get }
}
Add the CellItem structure. It has to conform to the Equatable protocol so we can use it as a value in ReloadableItem:
struct CellItem: Equatable {
   var value: CustomStringConvertible
   var id: String   static func ==(lhs: CellItem, rhs: CellItem) -> Bool {
      return lhs.id == rhs.id && lhs.value.description == rhs.value.description
   }
}
Here is the tricky part: the value is of type CustomStringConvertible. This gives us a simple way to conform to Equatable protocol through the description property. The cell id will be the cell unique identifier.
Once you updated the ProfileViewModelItem protocol, you will have to fix some errors: all the ProfileModelItems no longer conform to this protocol.
class ProfileViewModelNamePictureItem: ProfileViewModelItem {
   ...
   var cellItems: [CellItem] {
      return [CellItem(value: "\(pictureUrl), \(name)", id: sectionTitle)]
   }
   ...
}
For the ProfileViewModelNamePictureItem we can use a sectionTitle as a title in ReloadableItem, because this is the only cell in the section.
class ProfileViewModelAboutItem: ProfileViewModelItem {
   ...
   var cellItems: [CellItem] {
      return [CellItem(value: about, id: sectionTitle)]
   }
   ...
}class ProfileViewModelEmailItem: ProfileViewModelItem {
   ...
   var cellItems: [CellItem] {
      return [CellItem(value: email, id: sectionTitle)]
   }
   ...
}
For the ProfileViewModelAboutItem and ProfileViewModelEmailItem we also use a sectionTitle as a cell unique id.
class ProfileViewModeAttributeItem: ProfileViewModelItem {
   ...
   var cellItems: [CellItem] {
      return attributes
         .map { CellItem(value: $0, id: $0.key) }
   }
   ...
}
For the ProfileViewModeAttributeItem we have an attributes array, so wemap it to the array of ReloadableItem. Attribute key will be the cell title because we can only have one attribute of the specific type (in this example, attributes are the user height, eye color, weight, gender, etc).
To fix the compiler error, add a CustomStringConvertable extension to Attribute model:
extension Attribute: CustomStringConvertible {
   var description: String {
      return value
   }
}
Now do the same for ProfileViewModeFriendsItem. As a cell unique identifier, we are using the friend name. In the real app, it will be safer to use a userID, because it will always be a constant. In our example, we don’t use a userID, so the name will be enough.
class ProfileViewModeFriendsItem: ProfileViewModelItem {
   ...
   var cellItems: [CellItem] {
      return friends
         .map { CellItem(value: $0, id: $0.name) }
   }
   ...
}
And add a CustomStringConvertable extension to Friend model:
extension Friend: CustomStringConvertible {
   var description: String {
      return “pictureUrl”
   }
}
Finally, fix the last compiler error and update the numberOfRowsInSectionmethod:
func tableView(_ tableView: UITableView, numberOfRowsInSection section: Int) -> Int {
   return items[section].cellItems.count
}
The current ProfileViewModelItem is a protocol, so we create another structure to hold the section cells. This structure should also be Equatable:
struct SectionItem: Equatable {
   let cells: [CellItem]
   static func ==(lhs: SectionItem, rhs: SectionItem) -> Bool {
      return lhs.cells == rhs.cells
   }
}
At this point, the project should not have any compiler errors.
Part 5. Drive TableView Animations
Finally, we can parse the new data and calculate the tableView changes.
Once we receive the new data from the Firebase, we parsed it to the array of ProfileViewModelItem. We create a setup method, where we will do all the calculations for the data source:
private func setup(newItems: [ProfileViewModelItem]) {}
The DiffCalculator calculation method accepts two items of type ReloadableSectionData. So let’s create a method, that parses the array of ProfileViewModelItem to the ReloadableSectionData. The generic data that we use will be the CellItem (as you remember, it already conforms to the Equatable protocol).
private func flatten(items: [ProfileViewModelItem]) -> [ReloadableSection<CellItem>] {
   let reloadableItems = items
     .enumerated()                                          //1
     .map {                                                 //2
         ReloadableSection(key: $0.element.type.rawValue, value: $0.element.cellItems
             .enumerated()                                  //3
             .map {                                         //4
                ReloadableCell(key: $0.element.id, value: $0.element, index: $0.offset)
             }, index: $0.offset)
      }  return reloadableItems
}
Let’s go through flatten method code.
We are taking an array of ProfileViewModelItem and convert it to the indexed dictionary /1/, so we can easily access the index of each element. Then, we map this dictionary to the ReloadableSection /2/. Inside the mapping function we create a ReloadableSection using the array of cellItems,that we first convert to the dictionary /3/, and map to the array of ReloadableCell /4/. Finally, we return the array of ReloadableSection of type CellItem.
It setup, we will call the flatten method for both current items (self.items) and the newItems:
private func setup(newItems: [ProfileViewModelItem]) {
   let oldData = flatten(items: items)
   let newData = flatten(items: newItems)
}
Now we can use DiffCalculator to generate the section difference:
private func setup(newItems: [ProfileViewModelItem]) {
   ...
   let sectionChanges = DiffCalculator.calculate(oldItems: oldData, newItems: newData)
}
Now we have a SectionChanges object, that holds the IndexSet of the sections, that have to be inserted and deleted, and the array in IndexPath for all the cells, that have to be reloaded, inserted and deleted.
But before we can update the tableView, there is one critical step: we need to update the self.items with the newItems:
private func setup(newItems: [ProfileViewModelItem]) {
   ...
   self.items = newItems
}
If we don’t update the items, we will try to update the TableView, while the dataSource itself will have to changes. This will cause the app exception.
We are ready to pass the changes to the TableView and give it a try!
Add another method the ProfileViewModelDelegate:
protocol ProfileViewModelDelegate: class {
   func apply(changes: SectionChanges)
}
And call this delegate method from end of the Setup:
private func setup(newItems: [ProfileViewModelItem]) {
   ...
   delegate?.apply(changes: sectionChanges)
}
Finally, update the ViewController extension:
func apply(changes: SectionChanges) {
   self.tableView?.beginUpdates()
   self.tableView?.deleteSections(changes.deletes, with: .fade)
   self.tableView?.insertSections(changes.inserts, with: .fade)
   self.tableView?.reloadRows(at: changes.updates.reloads, with: .fade)
   self.tableView?.insertRows(at: changes.updates.inserts, with: .fade)
   self.tableView?.deleteRows(at: changes.updates.deletes, with: .fade)
   self.tableView?.endUpdates()
}
Build and run the project. Try to modify the real-time database. How does it look?

Thanks for reading! Please recommend this article, and feel free to give me your opinion or suggestion, so we can improve this feature together!
Source: https://medium.com

Comments
Post a Comment